Tools
Required:
Connect
XM203:
-
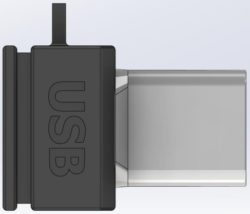
Remove the USB Dongle from the XM4 B.O.S.S. Unit.
-
Insert the USB-C cable into the XM203 Dongle Port and PC.
If the USB has power then the XM203 should start up as normal but show a flashing green and red LED to indicate a USB power source has been connected.
Insert USB
to PC and Open RDX XComms Link
- Open RDX XComms Link after downloading and installing.

- Use the dropdown to locate the newly created USB Serial Device looking for "XM203"
- Your COM number may be different than the number shown above.
- You may need to press "Refresh Ports" if not shown,
- Press Connect to establish a connection to the XM203 from the PC
Pressing [3] you should hear a beep from the XM203 and the LED should turn solid orange to indicate a successful connection.
- Connect should now change to disconnect which can be used to disconnect the XM203 later.
- The terminal window will show all commands sent and received from the XM203

Update
Firmware
- Now that you have a connection to the XM203. Let's do a firmware update.
- Press the button "FIRMWARE".

- After 3-5 Seconds a message box should appear informing you that a drive has been detected.
- The XM203 orange LED will now show a glowing green LED indicating the unit is now ready for the firmware

- In Windows File Explorer, a drive will appear with "RDX XM203"
- The drive letter may be different than the one shown
- This is the content of the new drive and where the new firmware file can be copied or moved into.
- Move the download file into the new drive

Once placed into the drive, the unit will reset and initialise as normal.
Problem
Solving:
Simply remove the USB and start over again.
If a drive is shown when connecting the USB, then simply copy the new or previous firmware into the drive to complete the firmware update process.
contact support@rdxtech.net if you require further assistance.
Last Updated: 26 Jul 2024